Planting Tips for Trees and Shrubs
Give a $5 tree a $50 hole goes the old adage. We’d be hard pressed to find a tree for $5 anymore but the spirit of the saying holds true. Selecting the right tree for the right space and correctly planting it are the two most important keys to the survival of a tree or shrub.
The right tree is one that fulfills your need—for shade, a windbreak, beauty or privacy. It also means that you consider the eventual height and spread of the tree, its need for full sunlight or ability to live in part shade, and its need for water or good drainage. The right tree in the right place will make both the tree and you happier.
Most woody plants in this area are available as container grown (in a pot of some type) or balled and burlapped (b+b). If you do not plant your new tree or shrub immediately after bringing it home, be certain you provide adequate moisture by watering thoroughly every day. And always handle plants by the roots, not by the trunk or top.
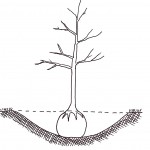
Preparing the hole Dig the new hole three times as wide as the root ball, but no deeper than the root system. Your new hole should resemble a saucer, not a teacup. The root flare (where the top of the root system becomes the trunk) must be at the final ground level. Roots need air as well as moisture to survive and planted too deeply will fail to thrive. Planted too shallowly, the roots may dry out.
Evaluate the soil you have removed. Adding up to 25 percent compost or well rotted manure is generally beneficial. Do not add fertilizer to the hole.
Setting in the plant For b + b plants, move the tree into the hole using the rope or wire surrounding the root ball. Then cut and remove at least the top third of the rope, burlap and wire basket (if present). Take off as much more as possible without disturbing the root ball. Check to be certain the root flare is at the level of soil. A stake laid across the hole will show you it you are at the correct depth.
For container grown plants, gently remove them from the pot. Then loosen roots along the outside of the rootball with your fingers or a blunt tool to encourage them to grow into the surrounding soil. Trim back any broken roots with pruners. Set it down into the prepared hole and again check to be certain the root flare is at the final soil level.
Finishing the job Backfill with the hole with your soil, making certain the tree is straight as you proceed. Tamp the soil gently into place. When you’ve finished, add water at low pressure, giving it time to percolate thoroughly through the hole. If the soil settles, add more to bring the level up to the root flare, and the roots are covered. Use soil to create a two to three inch high watering ring a foot or more outside the stem of the plant. Water the plant by filling the saucer with water each day for a week.
Mulch the area around the tree with no more than 2 to 3 inches of clean mulch. Maintaining a mulched area around a tree or shrub will eliminate damage from lawn mowers and trimmers and reduce competition for water especially during the vital first year.
Aftercare After the first week, water the tree once a week (unless Mother Nature provides an inch or more of rain) during its first year. Stake the tree only if the rootball is unstable or it is in an area of high winds. Any staking should be removed after one year.
